Detailed Steps for Running TechEmpower Web Framework Benchmarks on AWS
This is continued from my previous article:
Running TechEmpower Web Framework Benchmarks on AWS on my own
See that for the overview. Once you understood the motivation and background from the previous article, and want to see more details about how I ran the benchmark, please go on from here.
VPC setup
Before launching EC2, the first thing to set up is your VPC and associated Subnets, Route tables, etc. So create:
- a VPC
- a Subnet for the VPC
- an Internet Gateway (
igw=08af305fa33ed191bin the below screenshot) - a Route Table in the VPC, which can be like this:
- a Security Group
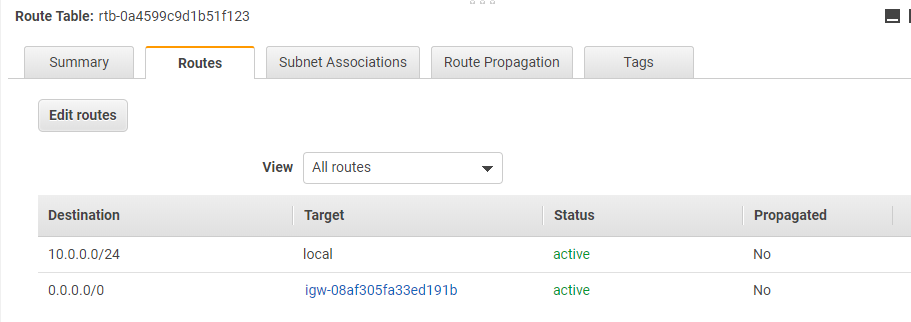
The Routes should allow the local traffic so that benchmarking can be run on three-machine setup. You also need the SSH traffic goes through the route table, so the Routes for the Internet Gateway is necessary.
Also you should create a Security Group:
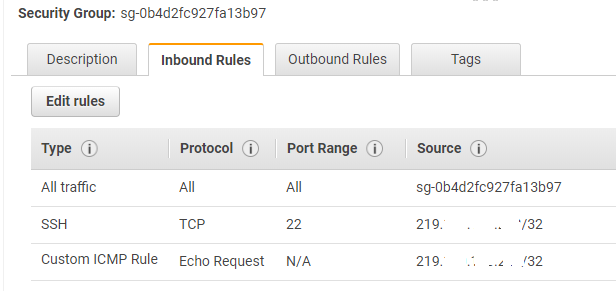
You need to enable SSH, and you'd better enable ICMP (Custom ICPM Rule) for ping for troubleshooting just in case. The source IP 219.***.***.***/32 is my local PC's public IP address.
For AWS beginners, note that Security Group is something you attach to EC2 instances, not to the Subnet. You'll attach this to the EC2 insatnces you set up as in the next section.
As the last note in the section, if you prefer a more secure environment, you can set up a jump host (a.k.a. Bastion host) or even split the network into multiple Subnets.
EC2 setup
Continued from the VPC setup, you now need to set up EC2. The first step is to choose AMI.

I chose the standard Amazon Linux 2 but other AMIs could work too. Amazon Linux 2 doesn't have docker installed by default, but it only requires a few extra steps to enable run the Docker daemon at startup.
Next, choose the instance type. It should be m5.xlarge as in my previous article Running TechEmpower Web Framework Benchmarks on AWS on my own

After that you should configure the instance. Choose
- Number of instances = 3 (for 3-machine setup)
- Network = your VPC configured earlier
- Subnet = your Subnet configured earlier
- "Auto-assign Public IP" = Enable
- Set up "User Data" to launch the Docker daemon at startup
"Auto-assign Public IP" is convenient when you need to SSH from your local PC later like below:
> ssh -i .ssh/your-aws-ssh-key.pem ec2-user@1.2.3.4 A public IP like 1.2.3.4 above is allocated at EC2 instance startup.
(Elastic IP would work too. Choose whichever you like.)
"User Data" is as follows, to bring up the docker daemon:
#!/bin/bash
yum update -y
amazon-linux-extras install docker

mkdir /etc/systemd/system/docker.service.d

echo "# /etc/systemd/system/docker.service.d/override.conf" >> /etc/systemd/system/docker.service.d/startup_options.conf
echo "[Service]" >> /etc/systemd/system/docker.service.d/startup_options.conf
echo "ExecStart= " >> /etc/systemd/system/docker.service.d/startup_options.conf
echo "ExecStart=/usr/bin/dockerd -H unix:// -H tcp://0.0.0.0:2375" >> /etc/systemd/system/docker.service.d/startup_options.conf

service docker start
usermod -a -G docker ec2-user
For more information about running docker at EC2 startup, see How do I enable the remote API for dockerd, and Failed to load listeners: no sockets found via socket activation: make sure the service was started by systemd:
// but use unix:// instead of fd://
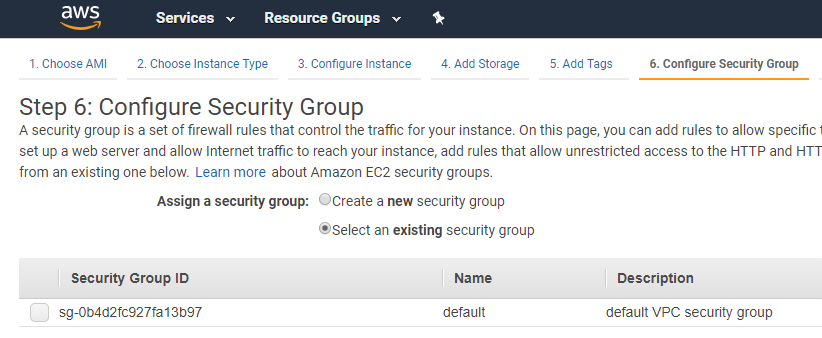
After the instance configuration, you can skip over to the step 6, Security Group. Choose the security group you created earlier:
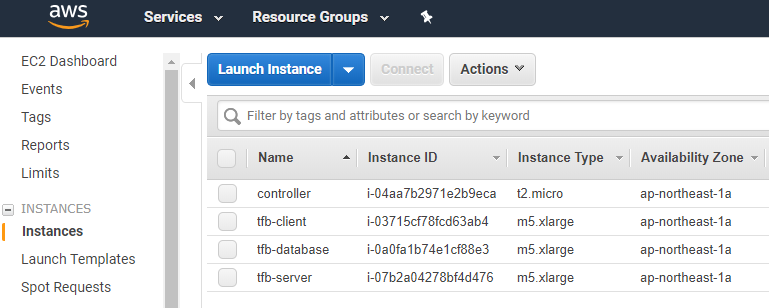
Actually I set up one more EC2 instance as a "controller" to execute the docker run... command remotely to the 3 EC2 instances I set up up to here. So the list of EC2 instances were:
The controller instance doesn't need to be m5.xlarge as it just sends docker run to remote EC2. (i.e.) you don't need to run the Docker daemon, but need a Docker client. Also you git clone the TechEmpower GitHub repo to run the benchmark startup script. So its user data can be this:
#!/bin/bash
yum update -y
amazon-linux-extras install docker

mkdir /etc/systemd/system/docker.service.d

echo "# /etc/systemd/system/docker.service.d/override.conf" >> /etc/systemd/system/docker.service.d/startup_options.conf
echo "[Service]" >> /etc/systemd/system/docker.service.d/startup_options.conf
echo "ExecStart= " >> /etc/systemd/system/docker.service.d/startup_options.conf
echo "ExecStart=/usr/bin/dockerd -H unix:// -H tcp://0.0.0.0:2375" >> /etc/systemd/system/docker.service.d/startup_options.conf

service docker start
usermod -a -G docker ec2-user
yum -y install git
cd /home/ec2-user
git clone https://github.com/TechEmpower/FrameworkBenchmarks.git
Run the benchmark
From here, the interesting part starts. SSH into the "controller" ec2 instance.
// replace 1.2.3.4 with the actual controller EC2's public IP
> ssh -i .ssh/your-aws-ssh-key.pem ec2-user@1.2.3.4
In short you'll just need to execute the following command:
./tfb  --test h2o \
  --network-mode host \
  --server-host 10.0.0.207 \
  --database-host 10.0.0.149 \
  --client-host 10.0.0.216
by replacing the parameters or adding extra parameters. Then the benchmark results are saved on the "controller" EC2 instance, under the FrameworkBenchmarks directory checked out from GitHub.
To remotely run wrk, web server and database from the controller, --network-mode and --server/database/client-host parameters are necessary. Otherwise, everything will run on the same EC2 machine as the "controller"
Let's see what this command means in more detail.
The tfb script is at the root of the FrameworkBenchmarks repository, and there is explanation about it in README.
The explanation is bit wordy - but to understand its inner behavior, and why I passed those parameters, you'll need to look into a couple of python scripts. The tfb script executes the run-tests.py script, which has description about all the possible parameters. The parameters you pass to tfb are mostly passed down to run-tests.py straight.
run-test.py depends on lots of other python scripts. And what's important for the remote benchmark execution is the following piece of code in benchmark_config.py script
class BenchmarkConfig:
    def __init__(self, args):
      ...
      ...
      if self.network_mode is None:
          self.network = 'tfb'
          self.server_docker_host = "unix://var/run/docker.sock"
          self.database_docker_host = "unix://var/run/docker.sock"
          self.client_docker_host = "unix://var/run/docker.sock"
      else:
          self.network = None
          # The only other supported network_mode is 'host', and that means
          # that we have a tri-machine setup, so we need to use tcp to
          # communicate with docker.
          self.server_docker_host = "tcp://%s:2375" % self.server_host
          self.database_docker_host = "tcp://%s:2375" % self.database_host
          self.client_docker_host = "tcp://%s:2375" % self.client_host
This piece of code means, if network_mode (equivalent to --network-mode parameter to the tfb script) is None, then it tries to remotely execute the web server on on server_host (--server-host parameter), database on database_host (--database-host parameter), wrk on client_host (--client-host parameter), with the docker run command via the 2375 port.
If all the network setup was correct, and parameters are correct, you start seeing the benchmark run remotely on separate EC2 instances. You can SSH into respective EC2 instances and run ps commands alike to verify that.
Again, the results will be saved in on the controller EC2 instance, and under the same directory as the TechEmpower GitHub repository checked out.